Stickman 5.3 Beta
Download from this site
The effectiveness of Stickman 5.3 will be on a high level because you simply press and hold a key to perform a specific action.
This sample move demonstrates 'Add Point to End A', 'Add Between Points B' and 'Delete Point D' with a polygon shape.
søndag 14. desember 2008
lørdag 13. desember 2008
Sub Shape Clipping
Stickman 5.3 Beta
Download from this site
A frequently requested feature is now added to Elemento.
Sub nodes of a shape will now be clipped inside the region of the shape.
It was not possible to add a sub node to a shape earlier.
As you may notice in the sample movie below, all new shapes are put into a matrix node by default.
mandag 8. desember 2008
New Time Slider
Stickman 5.3 Beta
Download here
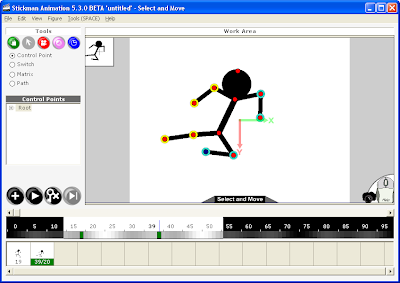
I've made the time line easier to use.
A traditional scrollbar replaces the fancy stretch and zoom scrollbar.
No zooming. It shows the current frame in bold and every 5th frame.
You can also right-scroll like the old one.
Personally I think the new one is much better.
Download here
I've made the time line easier to use.
A traditional scrollbar replaces the fancy stretch and zoom scrollbar.
No zooming. It shows the current frame in bold and every 5th frame.
You can also right-scroll like the old one.
Personally I think the new one is much better.

fredag 5. desember 2008
Patterns
Stickman 5.3 Beta
You can download here
I've experimented with something I call "Patterns".
A pattern is an intelligent structure that can be created by analyzing a figure.
For example "matrix leftArm is attached to leftArmBone".
Other examples:
"curve1 is deformed by point1.Pos, point2.Pos, point3.Pos"
"there is a rope connection between point4, point5 and point6"
"point1, point2, point3, point4 is connected to a rigid"
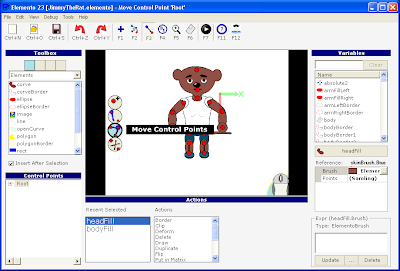
The good thing with patterns is that they can be changed.
For example, I want to make a leg a little longer.
In the bone tool, when you use the "move point" action, Stickman recognize all patterns connected to that control point.
Elemento updates the patterns while the user drags the control point.

tirsdag 25. november 2008
New Open Dialog
Stickman 5.3 Beta
Download (scroll to bottom)
Working on a new open file dialog that preview pictures (including Photoshop) and Stickman Elemento Figures. It just works!
Download (scroll to bottom)
Working on a new open file dialog that preview pictures (including Photoshop) and Stickman Elemento Figures. It just works!
mandag 24. november 2008
Start Relation is Removed
Stickman 5.3 Beta
Download (Scroll to bottom)
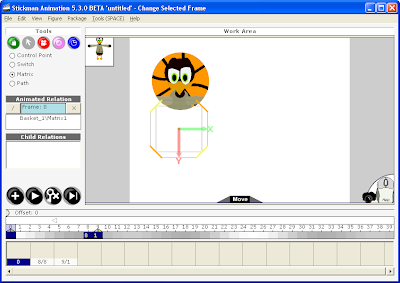
Today I removed the 'Start Relation' controls.
I think they just confused the user, took up screen space and created a mess.
Now, you can only create animated relations that do not 'jump'.
When releasing a relation, an 'after' draw order change is added.
The easier, the better.
For those that doesn't know what an relation is:
It's a connection between a figure and a matrix node inside another figure.
That connection moves the child figure when the parent is moving.
For example: To carry a box you select the box and choose the figure and hand to hold it.

søndag 23. november 2008
New Container Behaviour
Stickman 5.3 Beta
Download (Scroll to bottom)
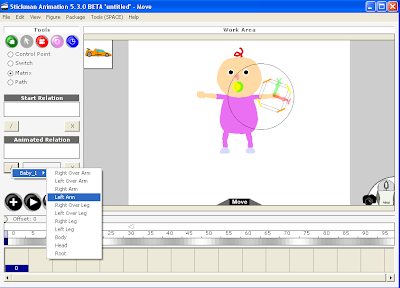
The container behaviour is changed to the better.
Before, only empty matrix nodes were treated as containers.
Now, all matrix nodes are treated as containers.
This means that you can connect an item to a body part of another figure.
Figure designers don't need to think of creating container any more,
because the attached matrix nodes will automatically be a container in Stickman.

lørdag 22. november 2008
New Interface Changes
Stickman 5.3 Beta
Download (scroll to bottom)
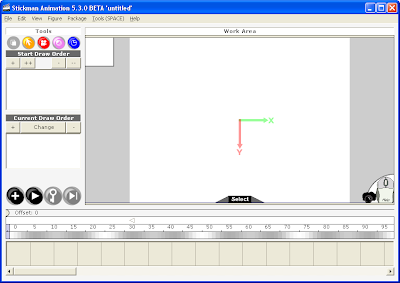
Today I replaced the category list with some color buttons.
Still working hard to get the interface more easier and easier to use.
Got a lot of ideas, but if you got some, please contact me.
Download (scroll to bottom)
Today I replaced the category list with some color buttons.
Still working hard to get the interface more easier and easier to use.
Got a lot of ideas, but if you got some, please contact me.

onsdag 5. november 2008
Almost so Easy as Thinking
I have been working a lot on the Stickman 5.3 Beta version.
A new and better way to use the tools:
One finger at the keyboard and the left mouse button!
Old procedure (camera tool):
1. Right click
2. Select 'Zoom'.
3. Drag with left mouse button.
4. Right click.
5. Select 'Move'.
New procedure:
1. Press Z for zoom.
2. Drag with left mouse button.
3. Release the Z button.
That saves the user for 4 mouse click for every action!
onsdag 1. oktober 2008
Some Big Interface Changes
I'm working on the Stickman 5.3 version, and I'm very thankful for the feedback I get. There seem to be a lot of people interested in the new version, since Stickman is moving from a rich color interface to a neutral professional looking interface.
I hope people enjoy the new render window, with YouTube, iPhone and DVD alternatives. A new function that has been asked for many times are the GIF export alternative.
A young man with the name Jonatan told me that he couldn't figure out how to move the background behind the figures. That can be done with the 'Draw Order' category.
Jonatan's brother, Bjørn Sverre, told me that he didn't like the F1, F2, F3 ... shortcuts. Bjørn Sverre asked me whether it was possible to use the numeric keyboard instead. A man from Australia with an injured arm has also asked me about this.
Yesterday morning, when I got out of bed, I started working on shortcuts. I found it difficult to use the numeric keyboard without typing numbers other places in the interface. Luckily, I found out that holding Ctrl blocks the input to text boxes.
The new keyboard shortcuts are like this (Ctrl+#):
Stickman
0 - Preview
1 - Figures
2 - Camera (animated)
3 - Matrix tool
4 - Control points tool
5 - Design camera
6 - Switch tool
7 - Path tool
8 - Speaker tool
9 - Volume tool
Elemento
0 - Run debug
1 - Selection
2 - Bone tool
3 - Placement
4 - Control points tool
5 - Camera
6 - Switch tool
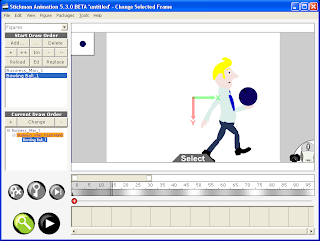
While working on this, I suddenly had a brilliant idea. I merged 'Draw Order' with 'Figures' and got this new interface:
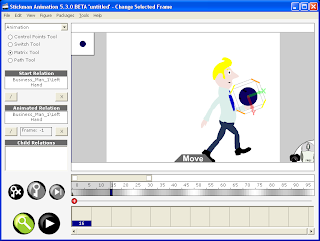
Then I found out that 'Containers' can be merged with 'Animation', visible when 'Matrix Tool' or 'Path Tool' is activated.
I hope this will help new users to overcome some of the new beginner struggles.
I hope people enjoy the new render window, with YouTube, iPhone and DVD alternatives. A new function that has been asked for many times are the GIF export alternative.
A young man with the name Jonatan told me that he couldn't figure out how to move the background behind the figures. That can be done with the 'Draw Order' category.
Jonatan's brother, Bjørn Sverre, told me that he didn't like the F1, F2, F3 ... shortcuts. Bjørn Sverre asked me whether it was possible to use the numeric keyboard instead. A man from Australia with an injured arm has also asked me about this.
Yesterday morning, when I got out of bed, I started working on shortcuts. I found it difficult to use the numeric keyboard without typing numbers other places in the interface. Luckily, I found out that holding Ctrl blocks the input to text boxes.
The new keyboard shortcuts are like this (Ctrl+#):
Stickman
0 - Preview
1 - Figures
2 - Camera (animated)
3 - Matrix tool
4 - Control points tool
5 - Design camera
6 - Switch tool
7 - Path tool
8 - Speaker tool
9 - Volume tool
Elemento
0 - Run debug
1 - Selection
2 - Bone tool
3 - Placement
4 - Control points tool
5 - Camera
6 - Switch tool
While working on this, I suddenly had a brilliant idea. I merged 'Draw Order' with 'Figures' and got this new interface:

Then I found out that 'Containers' can be merged with 'Animation', visible when 'Matrix Tool' or 'Path Tool' is activated.

I hope this will help new users to overcome some of the new beginner struggles.
lørdag 27. september 2008
Puppy Test
This is a try to combine frame-by-frame with cutout animation.
I used a switch node for each back leg on the puppy.
I used a switch node for each back leg on the puppy.
fredag 26. september 2008
Stickman Time Line
torsdag 25. september 2008
onsdag 24. september 2008
Traditional vs Cutout Animation
I have loved Disney movies since I was a kid, especially 'The Lion King'.
It looks so living without being real.
But how much work is it to create it?
Let's say, one person can animate 3 seconds of smooth 24 frames per second every week. To create 5 minutes, you need to work almost 2 years! Yikes!
Cutout is a technique to reduce work in the animation process. Instead of drawing every frame, the pieces are moved from frame to frame or animated with key frames like in Stickman. It's limited but effective.
Many of software packages try to bridge the gap between traditional and cutout animation. They hope to get the best out of both worlds. Stickman is very untraditional. For example, the 'Create Figure' editor (good old Elemento) are more like a programming tool than a graphics designer.
Programming is a way of controlling the relationship or logic between elements. In 'Create Figure' you can add skeleton and program attributes with expressions. It's exciting to see how a sketch drawing becomes a figure.
So, with programming, it is possible to fake some of the effects created with traditional animation. For example, squeeze & stretch, eye control and skeleton. I don't say cutout animation is better than traditional animation, but it is more effective. Cutout and traditional need to be considered as two different and separate genrees of animation.
If you work with traditional animation, your time and your skills is your limit. In cutout, you don't need drawing skills that much, but storyboard planning is more important.
Storyboard is like a comic strip of your movie. It helps the animator and director to cooperate. One scene can be very easy or very hard to animate, depending on how it is planned in the storyboard. The important thing is that the director and animator agree about how the movie will look at the end.
tirsdag 23. september 2008
Gida
I want to create a funny, simple character that looks like taken a child drawing.
I've named it 'Gida'.
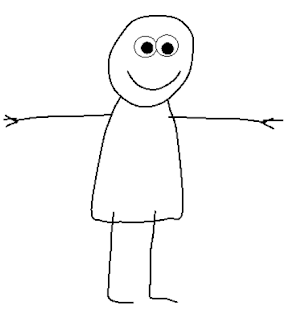
For the head and boy, I created a curve element. I used the 'freehand' mode to draw the shape. For the legs and arms, I used opencurve.
I used 'deform' nodes for the arms and legs.
No bones except for the head. That makes it more difficult to animate, but gives more control for stretch and squeeze.
Here are the control points:
I've named it 'Gida'.

For the head and boy, I created a curve element. I used the 'freehand' mode to draw the shape. For the legs and arms, I used opencurve.
I used 'deform' nodes for the arms and legs.
No bones except for the head. That makes it more difficult to animate, but gives more control for stretch and squeeze.
Here are the control points:
mandag 22. september 2008
Animate a Thinking Character
This article will tell you the secrets of good animation.
Good animation have more common with theatre than drawing or painting.
It depends mostly on how the character acts.
Take a look at these two pictures:
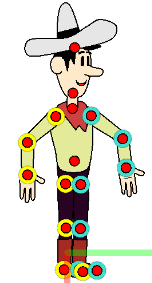
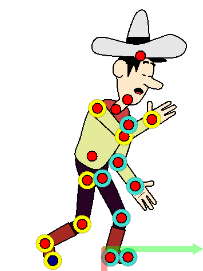
Can you tell me what the cowboy is doing in the first picture?
Can you tell me what the cowboy is doing in the second picture?
I can't tell you what the cowboy is supposed to do in the first picture. It just looks unnatural.
In the second picture, it's clear that the cowboy is tired (or sneezing). Maybe he's going to bed.
This is the difference between a thinking character and a controlled robot. Your job as an animator is the create the illusion of live. Make the character behave like it's thinking and acting on it's own.
The goal of animation is to make the publicum forget that what they are watching is animated.
Good animation have more common with theatre than drawing or painting.
It depends mostly on how the character acts.
Take a look at these two pictures:


Can you tell me what the cowboy is doing in the first picture?
Can you tell me what the cowboy is doing in the second picture?
I can't tell you what the cowboy is supposed to do in the first picture. It just looks unnatural.
In the second picture, it's clear that the cowboy is tired (or sneezing). Maybe he's going to bed.
This is the difference between a thinking character and a controlled robot. Your job as an animator is the create the illusion of live. Make the character behave like it's thinking and acting on it's own.
The goal of animation is to make the publicum forget that what they are watching is animated.
søndag 21. september 2008
Turn Wheel
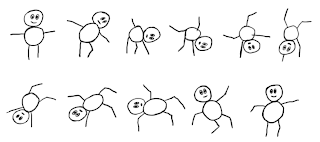
Yeat another frame-by-frame drawed animation.
This was for testing semi-transparent black pixels copied from Photoshop.
For some reason, Windows does not copy semi-transparent pixels to the clipboard (or is it Adobe Photoshop's fault?). Therefore, I created a new algorithm that filters out non-grayscale colors and sets the alpha by blackness value.

lørdag 20. september 2008
New Design
fredag 19. september 2008
Create Animated GIF
Here are some gif animations I've created with the upcoming Stickman 5.3.


Stickman 5.3 will include two new function:
1. Paste Drawing From Clipboard (removes the background color).
2. GIF export in CA (Create Animation).
This is how I did it:
1. Draw the frames in MS Paint:

2. Open Stickman. Select 'New Figure'.
3. In MS Paint, select a frame and use Ctrl+C to copy to clipboard.
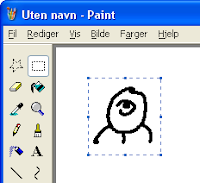
4. In Stickman CF (Create Figure), goto Edit->Paste Drawing From Clipboard.

5. Repeat step 3-4 for every frame.
6. In Stickman CF (Create Figure), goto Create->Control->Switch.
7. Put all images inside the switch.

8. Select 'Placement' and resize the figure so it fills the screen.
9. Save the figure and add it to Stickman CA (Create Animation).
10. Use the switch tool to flip the images. Create a key frame for each 5th frame.
11. Render as GIF Animation with 5 frames per second and resolution 64x64.


Stickman 5.3 will include two new function:
1. Paste Drawing From Clipboard (removes the background color).
2. GIF export in CA (Create Animation).
This is how I did it:
1. Draw the frames in MS Paint:

2. Open Stickman. Select 'New Figure'.
3. In MS Paint, select a frame and use Ctrl+C to copy to clipboard.

4. In Stickman CF (Create Figure), goto Edit->Paste Drawing From Clipboard.

5. Repeat step 3-4 for every frame.
6. In Stickman CF (Create Figure), goto Create->Control->Switch.
7. Put all images inside the switch.

8. Select 'Placement' and resize the figure so it fills the screen.
9. Save the figure and add it to Stickman CA (Create Animation).
10. Use the switch tool to flip the images. Create a key frame for each 5th frame.
11. Render as GIF Animation with 5 frames per second and resolution 64x64.
torsdag 18. september 2008
onsdag 17. september 2008
Time Delay Fixed
The new version of Stickman (5.3) will be much faster to receive news or to browse the online library. Users that had problems with time delay between the server in Norway and their location will get a better experience.
The problem was to detect the length of the data stream received over HTTP. Before, the length was unknown. Therefore Stickman had to wait some time before disconnecting the data stream. I found a method to read the data stream length. Now the data stream is closed immediately at the end. This means better speed.
The problem was to detect the length of the data stream received over HTTP. Before, the length was unknown. Therefore Stickman had to wait some time before disconnecting the data stream. I found a method to read the data stream length. Now the data stream is closed immediately at the end. This means better speed.
mandag 15. september 2008
Name Changes
Stickman & Elemento is now becoming 'Stickman'. The reason of this name change is that Stickman & Elemento are no longer two programs, but two different tools in the same program. Perhaps some customers are confused when they order, wondering if Elemento comes with Stickman, or if they need to order Elemento too.
Stickman & Elemento -> Stickman
Stickman -> Create Animation (CA)
Elemento -> Create Figure (CF)
The figure file format will still be elemento.
Stickman & Elemento -> Stickman
Stickman -> Create Animation (CA)
Elemento -> Create Figure (CF)
The figure file format will still be elemento.
søndag 14. september 2008
So Much Rewriting of Code!
I decided to change something that hasn't changed since Stickman 1.0. That's three years ago! What I wanted to do: Let the user choose tool action by right-clicking in the work area.
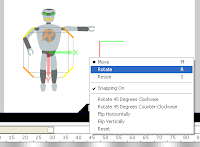
The problem was that, for example in matrix tool, the right+drag was used to rotate. So I had to rewrite all tools to use the new standard. From now on, the user will only use the left mouse button in a tool. Notice the icons on the left side of work area are removed and put into the right-click menu.
Another new feature is snapping. Snapping is turned on by default, you can turn it off by right-click and uncheck 'Snapping On'.
fredag 12. september 2008
New Stuff Coming Up
I've been working on the next version of Stickman for a while. There will be some big changes and many small ones.
One thing I discovered was that the toolbar with the shortcuts (F1, F2, ...) is a bad habit to use. Most users never find out how the software is structured because of this. I want people to develop from beginners to advanced users without getting boring. So I removed the toolbar in the new version, leaving the user with a drop down list and shortcuts.
The general idea is to let the user with two choices:
1. Select the appropriate tool from a list box
2. Use shortcuts
No colored toolbar that make bad habits.
Here's a screenshot of new interface of Stickman:
(the version number is not changed yet, the new version will be 5.3)
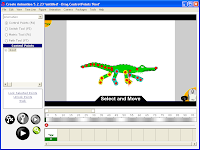
The interface does not look very fancy, but it's cleaner and I love it. It looks more like the old interface of Stickman 4, but I think new users will learn quicker.
One thing I discovered was that the toolbar with the shortcuts (F1, F2, ...) is a bad habit to use. Most users never find out how the software is structured because of this. I want people to develop from beginners to advanced users without getting boring. So I removed the toolbar in the new version, leaving the user with a drop down list and shortcuts.
The general idea is to let the user with two choices:
1. Select the appropriate tool from a list box
2. Use shortcuts
No colored toolbar that make bad habits.
Here's a screenshot of new interface of Stickman:
(the version number is not changed yet, the new version will be 5.3)

The interface does not look very fancy, but it's cleaner and I love it. It looks more like the old interface of Stickman 4, but I think new users will learn quicker.
søndag 20. juli 2008
Containers In Stickman & Elemento
This tutorial shows how to create and use containers.
Containers are a way for figures to pick up and carry items.
A figure can also be displayed inside a container, for example in a space ship.
Containers are a way for figures to pick up and carry items.
A figure can also be displayed inside a container, for example in a space ship.
lørdag 14. juni 2008
onsdag 4. juni 2008
The Magic of the Matrix
Matrix nodes are used to attach graphics to control points.
In this article I'll try to explain how they work.
1. A matrix node influences the coordinate system of sub nodes.
For example:

When you move matrix1, all sub nodes also move.
Since the matrix itself is invisible, it works perfect as a group tool.
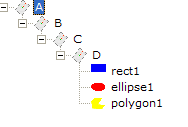
2. Combining multiple matrices result into one, new coordinate system.
For example:
equals
A * B * C * D = X
Where matrix X is used to draw the sub graphics.
What happens behind the scene when the graphics is attached to control points?
All matrix nodes got an 'Attach' action. This is used to 'glue' the matrix to control points.
First, put the graphics you want to attach into a matrix node.

Then, with bone tool, create two control points.
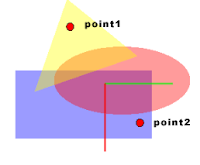
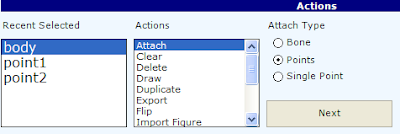
Select the 'body' matrix and use the 'Attach' action:

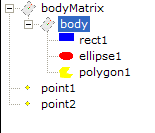
The 'Attach' action creates a new matrix node named 'bodyMatrix'.
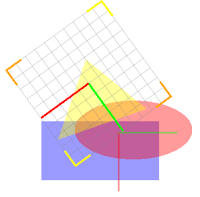
If we select 'bodyMatrix' we see the center is at 'point1' and rotating in direction of 'point2'.
'bodyMatrix' has the following expressions:
bodyMatrix.Offset = point1.Pos
bodyMatrix.Rotate = Rotate(point2.Pos;point1.Pos;.Rotate)
These epressions are executed at run time.
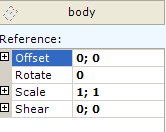
Notice the properties of 'body' also have changed.
This is to compensate for the Offset and Rotate property of 'bodyMatrix'.
Before:
After:
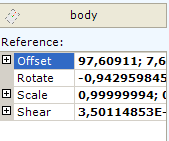
To understand this we need to think of matrix nodes as kind of math with just one law:
A * 1/A = 1
1/A equals the inverted A matrix.
1 equals a matrix node with default values.
To calculate the new values of 'body', the following formula is used:
oldbody = oldbody
bodyMatrix * 1/bodyMatrix * oldbody = oldbody
bodyMatrix * (1/bodyMatrix * oldbody) = bodyMatrix * newbody = oldbody
newbody = 1/bodyMatrix * oldbody
Matrix math is not only used in Stickman & Elemento but in most 2D and 3D games. If you can't understand them, don't worry. It just works!
In this article I'll try to explain how they work.
1. A matrix node influences the coordinate system of sub nodes.
For example:

When you move matrix1, all sub nodes also move.
Since the matrix itself is invisible, it works perfect as a group tool.
2. Combining multiple matrices result into one, new coordinate system.
For example:

equals
A * B * C * D = X
Where matrix X is used to draw the sub graphics.
What happens behind the scene when the graphics is attached to control points?
All matrix nodes got an 'Attach' action. This is used to 'glue' the matrix to control points.
First, put the graphics you want to attach into a matrix node.

Then, with bone tool, create two control points.

Select the 'body' matrix and use the 'Attach' action:


The 'Attach' action creates a new matrix node named 'bodyMatrix'.

If we select 'bodyMatrix' we see the center is at 'point1' and rotating in direction of 'point2'.

'bodyMatrix' has the following expressions:
bodyMatrix.Offset = point1.Pos
bodyMatrix.Rotate = Rotate(point2.Pos;point1.Pos;.Rotate)
These epressions are executed at run time.
Notice the properties of 'body' also have changed.
This is to compensate for the Offset and Rotate property of 'bodyMatrix'.
Before:

After:

To understand this we need to think of matrix nodes as kind of math with just one law:
A * 1/A = 1
1/A equals the inverted A matrix.
1 equals a matrix node with default values.
To calculate the new values of 'body', the following formula is used:
oldbody = oldbody
bodyMatrix * 1/bodyMatrix * oldbody = oldbody
bodyMatrix * (1/bodyMatrix * oldbody) = bodyMatrix * newbody = oldbody
newbody = 1/bodyMatrix * oldbody
Matrix math is not only used in Stickman & Elemento but in most 2D and 3D games. If you can't understand them, don't worry. It just works!
fredag 30. mai 2008
Recursive Node - New in Elemento 23
A new node called 'recursive' can be used to create plants in Elemento.
It draws all sub nodes recursively by replacing one of the sub nodes with itself.
The sub node to replace is defined by the 'ReplaceVariable' property.
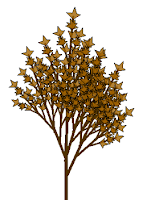
The 'Region' property controls the area to grow new branches.
Watch this tutorial to see how to set up the recursive node.
Elemento is part of the 2D animation software Stickman
It draws all sub nodes recursively by replacing one of the sub nodes with itself.
The sub node to replace is defined by the 'ReplaceVariable' property.

The 'Region' property controls the area to grow new branches.
Watch this tutorial to see how to set up the recursive node.
Elemento is part of the 2D animation software Stickman
lørdag 3. mai 2008
onsdag 23. april 2008
søndag 20. april 2008
torsdag 17. april 2008
søndag 13. april 2008
How Do You Make Animation Software?
Well, first you need to know a programming language.
I started with Visual Basic, known as VB when I was 13.
My uncle gave me a 1300 pages book about Visual Basic 3.0.
I thought I would know everything about computers by reading that book.
Of course you learn only a small part of programming by reading one book, but enough to do something that looks like magic for non-programmers.
I remember the first time I was able to save and load data from a file.
In old VB, there was not many functions for dealing with graphics.
Finally VB.NET came, with vector graphic and image support.
It all started when I read an article about skeleton simulation.
I made a little program with pictures attached to a skeleton, I thought that was a very easy way to animate. All software I write has some kind of technology in its kernel that makes the life easier to the users. The important thing is how the user interact with the technology, not the technology itself.
There are many ways of creating an animation software, that's why all animation software packages are different. Stickman 1.0 was designed to teach children how to animate with key frames. Later I created Elemento to build new figures for Stickman. I think separating the figure editor from the animation editor was a lucky guess I made. When I see back I think that's why Stickman & Elemento appeals to both children and grown-ups. The youngest user I know is 6 years and the oldest 80!
You can download Stickman & Elemento from this page.
torsdag 27. mars 2008
Sven shows you how to animate a simple helicopter in Stickman.
Visit www.cutoutpro.com for more information about Stickman.
Visit www.cutoutpro.com for more information about Stickman.
torsdag 6. mars 2008
Elemento Basics
Sven shows you how to get started with Elemento, the figure editor for Stickman.
Elemento is using three principles:
- elements (visible or not visible)
- references (link one property of one elemento to another property)
- expressions (program the behaviour of properties)
Click on the link below to download Stickman:
Cutout Pro
Elemento is using three principles:
- elements (visible or not visible)
- references (link one property of one elemento to another property)
- expressions (program the behaviour of properties)
Click on the link below to download Stickman:
Cutout Pro
fredag 29. februar 2008
Tricks You Didn't Know
Stickman got cool features that makes animating fast and easy, but did you know there are shortcuts to work even faster?
torsdag 28. februar 2008
The 2D Revolution
Imagine yourself back to 1980, when nobody got a personal computer.
Still there were Disney movies that made every child dreaming of creating their own cartoon movies.
Can this dream come true today?
Why not take a look at this software:
http://www.cutoutpro.com
Still there were Disney movies that made every child dreaming of creating their own cartoon movies.
Can this dream come true today?
Why not take a look at this software:
http://www.cutoutpro.com
Abonner på:
Kommentarer (Atom)


